Inside DEX (AMM) Explained: How Liquidity Pools Enable Token Swaps
Decentralized Exchanges (DEXes) have transformed cryptocurrency trading by enabling peer-to-peer transactions directly from user wallets. This eliminates intermediaries, offering greater security and

Etienne Maway
January 10, 2025 · 8 min read
Decentralized Exchanges (DEXes) have transformed cryptocurrency trading by enabling peer-to-peer transactions directly from user wallets. This eliminates intermediaries, offering greater security and autonomy compared to centralized exchanges.
At the core of DEXes are liquidity pools, which replace traditional order books. These pools rely on liquidity providers (LPs) who deposit token pairs like ETH and an ERC-20 token into a smart contract. In return, LPs receive LP tokens, representing their share of the pool and entitling them to a proportion of trading fees.
This article explores how Exchange smart contracts power liquidity pools in DEXes, focusing on token pairing, LP token minting, and automated market-making. We’ll also clarify common misconceptions and showcase their flexibility in DEX operations.
What is an Exchange Smart Contract?
An Exchange Smart Contract is a blockchain-based program that manages a liquidity pool for a specific token pair, such as ETH/MyToken. It automates liquidity provision, token swaps, and price adjustments.
Purpose of an Exchange Contract
- Facilitate Liquidity Provision:
Users deposit equal values of two tokens into the pool, managed by the contract. - Enable Token Swaps:
The contract allows seamless token swaps, adjusting prices using formulas like x * y = k. - Mint LP Tokens:
LPs receive tokens that represent their pool ownership, which can later be redeemed for their share. - Determine Prices Dynamically:
Prices are adjusted based on token reserves, reflecting supply and demand.
Key Features
- LP Tokens: Represent pool ownership and are minted for LPs as they contribute liquidity.
- Token Pairing: Works with a specific token pair (e.g., ETH/MyToken), requiring separate contracts for each pair.
- Automated Market-Making (AMM): Ensures constant liquidity and dynamic price adjustments via algorithms like the constant product formula.
- Fee Distribution: Distributes trading fees to LPs as rewards, proportional to their share.
Technologies and Tools Used
Building an Exchange smart contract requires a robust development stack. We made use of:
- Foundry : A comprehensive framework for Ethereum smart contract development, offering tools for writing, testing, and deploying Solidity code.
- Solidity: The primary language for writing Ethereum smart contracts. It powers the core logic of the Exchange contract.
- OpenZeppelin Contracts: OpenZeppelin provides reusable, secure, and audited contract libraries.
- Why OpenZeppelin?
- Reduces development time.
- Ensures contract security through pre-audited code.
Foundry Setup
Start off by creating a new folder on your computer — I named mine dex-app.
Open up a Terminal pointing to the dex-app folder and run the following commands:
We also need to install OpenZeppelin’s contracts as we will use it to build out the ERC-20 Token. Run the following commands:
To configure remappings in your project and make sure they’re picked up when compiling your code, run the following command:
Environment Variables
Start off by going to the .env file inside the dex-app folder and add the following placeholder lines:
For the PRIVATE_KEY variable, export it from MetaMask. Again, make sure to use an account that only has testnet funds in it, no mainnet funds, to not risk accidentally leaking a private key with real money in it.
For the INFURA_RPC_URL, create an account at Infura or any provider of your choice, if you don't have one already. Create an endpoint, select Ethereum, and Sepolia testnet. Replace the value of the INFUR_RPC_URL variable in the .env file with the HTTP Provider link you copied.
Lastly, we need an Etherscan API Key to have our contract verified on Etherscan. You can get an Etherscan API Key by creating an account on https://etherscan.io if you don’t have one already. Replace the value of ETHERSCAN_API_KEY in your .env file.
Making an ERC-20 Token
Now, let’s start off by creating a really simple ERC-20 Token that will be used to create the trading pool on our exchange. We will just use our custom token.
Create a new file named MyToken.sol under foundry-app/src and write the following code there:
This contract is a very basic ERC-20 that just mints 10 million tokens to the deployer address.
Setting Up the Exchange Contract
The Exchange contract is initialized via its constructor, which:
- Identifies the Paired Token: Accepts the address of an already deployed ERC-20 token (e.g., MyToken).
- Defines the LP Token: Sets the Exchange as an ERC-20 token (LP Token) to issue LP tokens to liquidity providers.
- Stores the Token Address: Saves the ERC-20 token address for interacting with its functions.
- LP tokens represent ownership of the ETH-token liquidity pool, enabling decentralized swaps and automated market-making.
Main Functionalities
- addLiquidity:
Users call addLiquidity, sending ETH and tokens. The function calculates the required token amount to maintain the pool ratio, updates reserves, and mints LP tokens.
- LP Token Minting: LP tokens represent the user’s share of the pool. If the pool is empty, tokens minted match the ETH added. Otherwise, they are proportional to the user’s contribution.
- Formula:
- Example:
A user adds 10 ETH and 500 tokens to an empty pool, receiving 10 LP tokens. Adding 1 ETH to a pool with 100 ETH and 5000 tokens mints 1% of LP tokens, matching the user’s ETH contribution.
2. removeLiquidity:
This function allows users to withdraw liquidity from the pool by burning their LP tokens. It ensures that users can redeem their LP tokens for their share of the pool’s assets, in proportion to their stake in the liquidity pool. The function returns both ETH and tokens to the user while updating the pool’s reserves and LP token supply.
3. tokenSwap functions
The ethToTokenSwap and tokenToEthSwap functions facilitate seamless exchanges between ETH and tokens in the pool. Using the constant product formula x×y=kx, these swaps dynamically adjust prices based on reserves.
- ETH to Token: Users send ETH, and the contract calculates the token amount using a 1% fee. Tokens are transferred if the amount meets the user-defined minimum.
- Token to ETH: Users send tokens, and the contract calculates the corresponding ETH amount. ETH is transferred if it satisfies the minimum condition.
The formula ensures fair pricing and stability in the pool, with every swap slightly increasing liquidity.
Test your DEX
You can create a file in test/Exchange.t.sol and paste this test script:
Run the Tests
- Compile Contracts:
- Run Tests:
. View Gas Reports (optional):
If you followed along, you should see in your terminal:
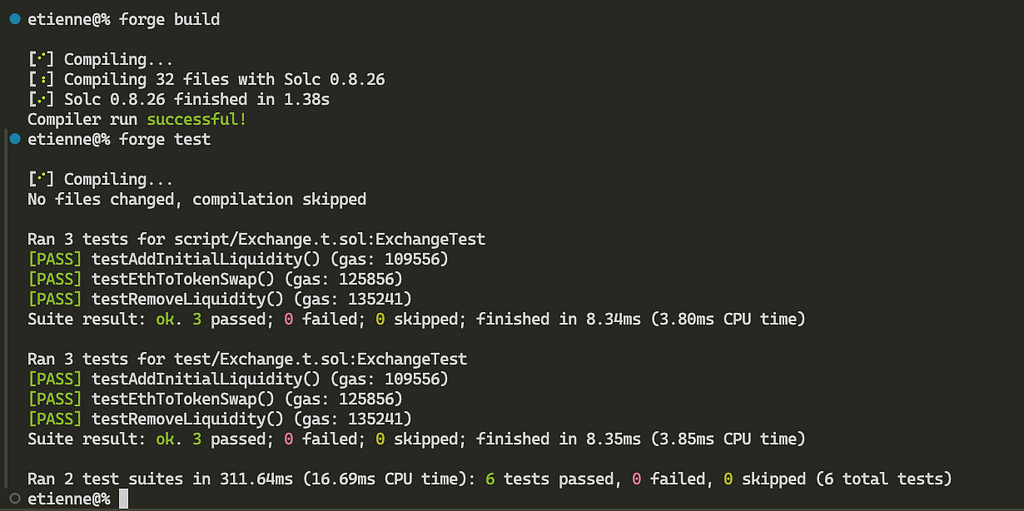
- testAddInitialLiquidity:
Tests the initial liquidity addition by verifying the minted LP tokens. - testEthToTokenSwap:
Tests ETH to token swaps, ensuring tokens are received based on the reserves and fees. - testRemoveLiquidity:
Tests liquidity removal, ensuring the returned ETH and tokens match expectations.
This script ensures your contract works as expected, covering critical functionalities like liquidity provision, swaps, and withdrawals.
Deployment Instructions
With the contracts completed, the next step is deploying them. Follow these steps:
- Load Environment Variables
Start by loading the environment variables into your terminal. Run the following command:
- Deploy the MyToken Contract
Navigate to the dex-app directory in your terminal and deploy the token contract using this command:
Once deployed, note down the token contract address, as you’ll need it for deploying the Exchange contract.
2. Deploy the Exchange Contract
Using the token contract address obtained earlier, deploy the Exchange contract by running:
NOTE:
If you encounter a message stating that the contracts are already verified, it might be because identical contracts cannot be re-verified on the same network. To handle this, you can run:
forge verify-contract <contract_address> <contract_name> --chain <chain_name>
You can as well manually open up both contracts — the MyToken and the Exchange — on Sepolia Etherscan and manually test.
CONGRATULATIONS, we have just rebuilt a simple DEX similar to UNISWAP V1 from scratch, tested and successfully deployed to a testnet.